The Iceberg Model

When I think of stikis, I think of little squares that you can move around and type into and being able to zoom around the page. Writing the code to do these things was lot of work, but I’m beginning to appreciate that it’s only a small proportion of the total amount of work required to keep a site like this running. There are lots of other less glamorous things, such as writing help pages, making sure software is kept up to date, deleting spam comments from the wiki, responding to emails, and writing blog posts. In this way, stikis is sort of like an iceberg. There’s the small visible part out the top and the big hidden part beneath.
Models of the software development process often focus on the steps involved and how they relate to one another in a sequence. For example, the famous waterfall model represents software design as happening in stages from requirements gathering, to specification, to implementation, testing, integration and maintenance. Another well known model, the spiral model, while more sophisticated (giving more attention to iterative aspects of software development) is still constructed around the idea of stages and progression.
Models like this are especially useful as resources for project management and planning because they highlight dependencies between stages thereby allowing project managers to assign and coordinate organisational responsibilities. However, in a single developer project - like stikis - these organisational aspects are less important. What instead becomes difficult is maintaining a balance between all the different tasks that are required. This is especially so in a web-application context, where development, testing, maintenance and support are running alongside an already deployed application. In this case, I think it might be more useful to think of software development as being like an iceberg, rather than a waterfall or spiral.
The thing about icebergs is that they need to maintain a balance between the small visible part and the larger hidden part. If they don’t then the iceberg’s going to tip over (and the penguins won’t be happy). This is where thinking about your development work as an iceberg gets useful. The fun parts above the water are always calling for your attention, but if you spend all your time working there, you’ll eventually end up with help pages that are out of date, tests that don’t test the right things and spam-filled forums.
I’m not sure of the exact numbers, but if we assume that 86% of the average iceberg is beneath the water and 14% above - then that means for every hour you spend working on new features, you need to spend 6 working on the other stuff. Conveniently for the single developer, this means that you can plan your week of spare-time-development something like:
- mon: interaction design
- tue: write tests (software design)
- wed: develop
- thu: documentation
- fri: blog
- sat: deploy
- sun: server maintenance & review usage
…or some other order - provided enough time is spent on each of the activities. (Support emails should be answered as soon as possible.)
Does this seem sane?
Scheduled maintenance
I’ll be taking the site off-line later tonight to push an update. Hopefully the maintenance won’t take longer than half an hour.
Update: I’ve completed the maintenance and the site is back up. It took a lot longer than I anticipated - three hours instead of half an hour. Apologies for any inconvenience. I’ll write about the update some more later this week.
Preliminary IE6 support
Phew, that was good to write as a headline. Actually, IE6 support turned out to be much simpler than I anticipated. It mostly hinged on two things - my use of fixed positioning, and png graphics. Thankfully there are fairly simple fixes for these obstacles that allowed me to get IE6 working with stikis from just a couple of hours work.
For fixed positioning, I used conditional comments to insert a IE6 stylesheet and used absolute positioning instead (along with html, body {height: 100%} ). For png graphics, I used a combination of substituting gifs where I could (all the icons) and using some javascript to fix the shadows of the stikis.
There still seem to be some glitches - for instance, when resizing stikis, there’s a noticable lag as the contents have their size updated to match. Also, the expander buttons don’t seem to work properly. However, as the headline says - IE6 support is preliminary. This means that it should work, but please, please tell me if it doesn’t.
Cheers, Jared.
OpenID part 1: A better way to log in
If you have an OpenID, it’s the most convenient way to access stikis. This is the first of three articles about my experiences of providing openid logins on stikis. In this post, I’ll try to explain what OpenID is in simple terms (and highlight the new affiliate signup feature on the stikis login and signup pages). I won’t be going into too much technical depth, but hopefully, if you’re not familiar with OpenID yet you’ll have a better idea of what it is by the end of the article (for another great introduction to OpenID, see this screencast by Simon Willison).
In the next post, I plan to discuss some of the early usability lessons I’ve learnt for providing OpenID logins, and highlight of the salient issues you might want to consider when providing OpenID on your own site. In the final part, I’ll show how I test the parts of stikis that use OpenID using the ruby mocha gem.
OpenID is a better way to prove who you are.
If you don’t have an OpenID, you’re probably wondering what I’m talking about. One way I could describe it is as a new way to log in to websites. The most common way of allowing logins to a website now is to ask people to enter a username and password to prove who they are. There are lots of problems with this. It means you have to remember lots of passwords, you have to trust every site you log into to keep your password secure and you have to update your personal information in lots of places if it changes.
What if, instead of needing a separate username and password for each website you visited, you could just tell the website to go and check an address that you own to verify that you are who you say you are? That’s how OpenID works. Here’s a really simple cartoon that shows the process of an OpenID login.
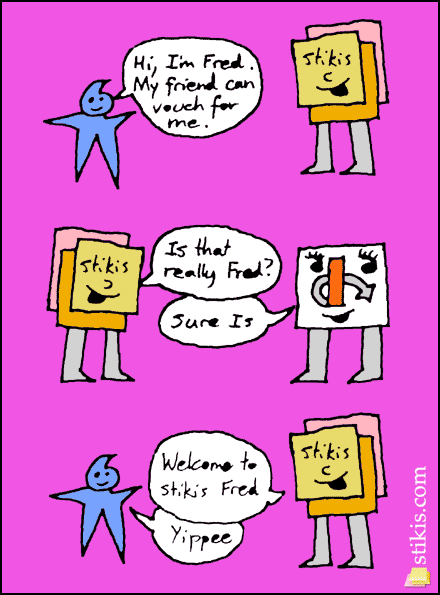
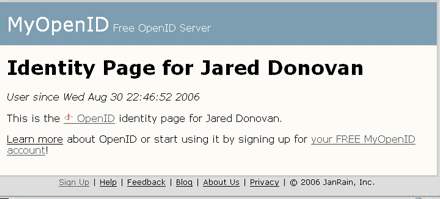
The key part of this process is that there is a place on the web that you can point to which will be able to verify you are who you say you are (Fred’s ‘friend’ in the cartoon above). In fact, OpenIDs look just like regular web addresses. For example, here’s one of mine…
http://jared.donovan.myopenid.com
If you click on it, you’ll be taken to a webpage that looks like this…
Getting an OpenID
This brings us to the next question - how do you get hold of an OpenID address that you can own and that can verify you? There are a couple of different options
- Set up your own OpenID server on a website that you control. There are several free OpenID libraries you can use to help you with this. Stikis uses ruby-openid, written by Brian Ellin.
- Get an OpenID account from any of several free services that are available. In the example above, you can see that I’ve got an account with MyOpenID.com, some others are pip.verisignlabs.com and GetOpenID.com, there are many others to choose from too.
- Add a link to a web-page that you own that will delegate the openid authentication process to another server. This is much simpler than it sounds, it’s actually sort of a combination of the first two options.
- Finally, you may find that you already have an OpenID without even knowing it. If you’ve got a LiveJournal account, your OpenID will be fred.livejournal.com (substituting your own login for ‘fred’).
Another way you can get an OpenID is through the affiliate sign up link that’s provided on the stikis welcome, login and signup pages. Beneath the openid login form, there’s a grey box that looks like this…
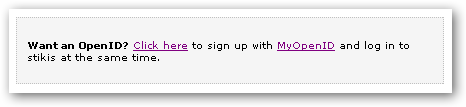
If you follow the ‘click here’ link you’ll be taken off to a MyOpenID signup page which is customised for stikis users. Once you’ve finished the MyOpenID signup process, you’ll be sent back to stikis and logged in automatically. It’s painless.
This magic is all courtesy of the MyOpenID affiliate programme. If you’re running a site and you’d like to make it easy the people who visit your site to get an OpenID, I’d suggest giving it a try. It’s really easy to set up, and the staff at MyOpenID are really great to work with…but I’ll talk more about that in the next post.
Zoom zoom zoom
The changes to the way zooming works that I wrote about in my last post are now integrated into the live site, so please give zooming a try and let me know what you think.
Also included in this update:
- Now you’re taken back to the last page you were working on, rather than the list of pages.
- A bugfix for IE where in the list of pages, the list was not showing up. D’oh! This should be fixed now.
Also, stikis user dantaeus left a comment on the previous post asking if I have plans for an api for the service. The answer is yes, and to start the ball rolling, I’ve created a discussion page on the stikis help wiki as well as a mailing list. If you’re interested in coding against an api for stikis I’d love to hear your thoughts on what would be useful.